If you’re a homeowner or tenant who relies on a dryer to do your laundry, a non-starting dryer can be a frustrating problem to deal with. There could be several reasons why your dryer won’t start, and not all of them require a professional technician to fix. In this guide, we’ll explore the common causes of a non-starting dryer and provide solutions to help you troubleshoot and fix the problem.
Possible Causes of a Non-Starting Dryer
Lack of Power Supply
If your dryer won’t start, a lack of power supply is the most likely culprit. Before looking into other causes, ensure that your dryer is plugged in correctly and that the outlet is functioning. You can use a voltage tester to check the outlet for the correct voltage. Check the circuit breaker to see if it has tripped and reset it if necessary. If it trips again, call a professional technician. Additionally, check for a blown fuse and inspect the power cord for damage. Replacing a damaged cord can help restore power to your dryer. Remember, electrical problems should be left to a qualified professional.
Malfunctioning Thermal Fuse
A non-starting dryer may also be caused by a malfunctioning thermal fuse. This safety component prevents the dryer from overheating and may prevent the dryer from starting if it’s blown or not functioning properly. To check the thermal fuse, locate it on the blower housing or exhaust duct and test it for continuity using a multimeter. It’s important to identify and address the underlying issue causing the thermal fuse to blow, such as restricted airflow or a malfunctioning thermostat. Replacing the thermal fuse is a simple process, but ensure that you have the correct replacement part by consulting the user manual or seeking professional assistance.
Damaged Heating Element
To check it, locate the heating element by opening the dryer cabinet and use a multimeter to test it for continuity. If there’s no continuity, replace the heating element. It’s important to address any underlying issues, such as a clogged exhaust vent or a faulty thermostat, to prevent the new heating element from becoming damaged. If you’re not comfortable working with electrical components, it’s best to call a professional technician for assistance.
Absence of Gas Supply
For gas dryers, the absence of a gas supply can prevent them from starting. Make sure the gas valve is open and the gas supply is functioning properly. You can test the gas supply by turning on another gas appliance in your home.
A faulty gas igniter can also cause a gas dryer to fail to start. This igniter lights the gas and starts the dryer. To diagnose this issue, locate the igniter in the dryer cabinet and test it with a multimeter. If it’s not working correctly, it will need to be replaced.
It’s important to note that gas appliances can be dangerous, so if you suspect an issue with the gas supply or igniter, seek assistance from a professional technician.
Faulty Door Switch
A malfunctioning door switch can prevent a dryer from starting even when there is power. The door switch is a safety component that prevents the dryer from starting when the door is open. To diagnose the issue, locate the door switch near the door frame and use a multimeter to test it for continuity. If it’s faulty, replace it with the correct replacement part. It’s important to address this issue promptly as a faulty door switch can pose a safety hazard.
Defective Start Switch
A defective start switch can prevent a dryer from turning on. This component is responsible for initiating the dryer’s motor and heating elements. To check the start switch, locate it on the dryer’s control panel and use a multimeter to test it for continuity. If the start switch is defective, it needs to be replaced.
Failed Drive Motor
If your dryer’s drum isn’t turning, the failed drive motor may be the culprit. The drive motor is responsible for turning the dryer drum, and if it’s not functioning correctly, the dryer won’t start.
To check the drive motor, you’ll need to locate it, which is typically found at the dryer’s bottom or back. You can use a multimeter to test the drive motor for continuity. If the multimeter shows that there’s no continuity, it means that the drive motor has failed and needs to be replaced.
It’s also worth noting that a failed drive motor can be a result of a more significant issue, such as a damaged belt or a malfunctioning blower wheel.
Control Board Malfunction
When a dryer fails to start, it may be due to a malfunctioning control board that regulates the motor and heating elements. To diagnose this issue, use a multimeter to check the voltage of the control board’s electrical connections. If the readings are outside the recommended range, the control board needs replacement. Access the control board, which is typically located behind the control panel, and ensure you have the correct replacement part. Refer to the user manual or a professional technician for assistance.
Broken Drive Belt
- If you suspect that the drive belt in your dryer is broken, here are some diagnostic steps to follow:
- Turn off the dryer and unplug it from the electrical outlet.
- Locate the drive belt, which is typically found around the drum of the dryer.
- Inspect the drive belt for any signs of wear or damage, such as cracks or breaks. If the belt is broken or worn, it will need to be replaced.
- To confirm that the drive belt is broken, try to rotate the drum by hand. If the drum does not rotate, the drive belt is likely broken.
- If the drive belt is broken, refer to your dryer’s user manual for instructions on how to replace the belt. Make sure to purchase the correct replacement belt for your specific dryer model.
- Once the new belt is installed, plug the dryer back into the electrical outlet and turn it on to test for proper operation.
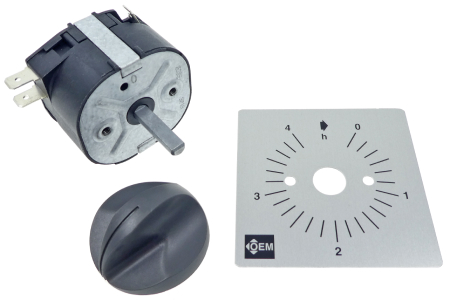
Broken Timer
Here’s how to diagnose a broken timer:
- Unplug the dryer and locate the timer, which is typically found behind the control panel.
- Remove the control panel to access the timer. Some dryers may have screws holding the panel in place, while others may have clips or snaps that need to be released.
- Once you’ve exposed the timer, use a multimeter to test it for continuity. To do this, touch the probes of the multimeter to the timer’s terminals. If the multimeter doesn’t register continuity, then the timer is broken and needs to be replaced.
- If the timer is registering continuity, there may be other issues causing your dryer’s problem, such as a broken belt, malfunctioning thermostat, or faulty motor. It’s best to consult a professional if you’re unsure.
Faulty Motor Relay
How to diagnose a faulty motor relay:
- Unplug the dryer and locate the motor relay, which is typically found near the motor.
- Remove the motor relay cover to access the relay. Some dryers may have screws holding the cover in place, while others may have clips or snaps that need to be released.
- Once you’ve exposed the relay, use a multimeter to test it for continuity. To do this, touch the probes of the multimeter to the relay’s terminals. If the multimeter doesn’t register continuity, then the motor relay is faulty and needs to be replaced.
- If the motor relay is registering continuity, there may be other issues causing your dryer’s problem, such as a broken belt, malfunctioning thermostat, or faulty timer. It’s best to consult a professional if you’re unsure.
Defective Thermostat
How to diagnose a defective thermostat:
- Unplug the dryer and locate the thermostat, which is typically found near the heating element.
- Remove the cover to access the thermostat. Some dryers may have screws holding the cover in place, while others may have clips or snaps that need to be released.
- Once you’ve exposed the thermostat, use a multimeter to test it for continuity. To do this, touch the probes of the multimeter to the thermostat’s terminals. If the multimeter doesn’t register continuity when the thermostat is heated to the appropriate temperature, then the thermostat is defective and needs to be replaced.
- If the thermostat is registering continuity, there may be other issues causing your dryer’s problem, such as a faulty timer, motor relay, or belt switch.
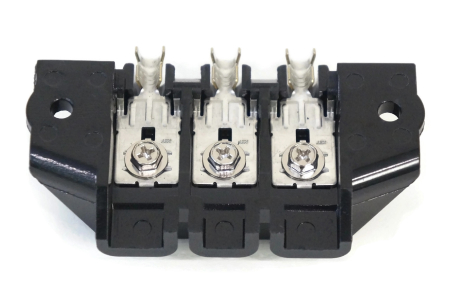
Terminal Block Failure
How to diagnose a terminal block failure:
- Unplug the dryer and locate the terminal block, which is typically found near where the power cord enters the dryer.
- Remove the cover to access the terminal block.
- Once you’ve exposed the terminal block, use a multimeter to test it for continuity. If the multimeter doesn’t register continuity, then the terminal block has failed and needs to be replaced.
- If the terminal block is registering continuity, there may be other issues causing your dryer’s problem, such as a faulty power cord, motor relay, or thermostat.
Solutions to Fix Your Dryer
Fixing the Door Switch
The door switch is a safety component that prevents the dryer from running if the door is open. Here’s how you can fix a faulty door switch:
- Unplug the dryer and locate the door switch, which is usually located near the door opening.
- Use a putty knife or a screwdriver to remove the front panel of the dryer. Depending on your dryer model, you may need to remove screws or clips to release the panel.
- Locate the door switch and use a multimeter to test for continuity. To do this, set the multimeter to the continuity setting and touch the probes to the two terminals on the door switch. If the multimeter doesn’t register continuity when the switch is pressed, then the door switch is faulty and needs to be replaced.
- Remove the faulty door switch by disconnecting the wires connected to it. Take note of the wire connections and where they are connected so that you can connect the new switch properly.
- Install the new door switch by connecting the wires to their corresponding terminals. Make sure that the switch is properly aligned with the door and that the screws are tight.
- Reassemble the front panel and plug the dryer back in.
- Test the dryer to ensure that it starts when the door is closed.
Servicing the Start Switch
How you can fix a defective start switch:
- Unplug the dryer and locate the start switch, which is usually located on the control panel.
- Depending on your dryer model, you may need to remove the control panel to access the start switch. Remove the screws or clips holding the panel in place.
- Once you’ve exposed the start switch, use a multimeter to test for continuity. To do this, set the multimeter to the continuity setting and touch the probes to the two terminals on the start switch. If the multimeter doesn’t register continuity when the switch is pressed, then the start switch is defective and needs to be replaced.
- Remove the defective start switch by disconnecting the wires connected to it. Take note of the wire connections and where they are connected so that you can connect the new switch properly.
- Install the new start switch by connecting the wires to their corresponding terminals. Make sure that the switch is properly aligned and that the screws are tight.
- Reassemble the control panel and plug the dryer back in.
- Test the dryer to ensure that it starts when you press the start switch.

Fixing the Thermostat
If the thermostat is defective, it can cause the dryer to overheat or not heat at all. Here’s how you can fix a defective thermostat:
- Unplug the dryer and locate the thermostat, which is usually located near the heating element.
- Use a putty knife or a screwdriver to remove the front or back panel of the dryer. Depending on your dryer model, you may need to remove screws or clips to release the panel.
- Locate the thermostat and use a multimeter to test for continuity. To do this, set the multimeter to the continuity setting and touch the probes to the two terminals on the thermostat. If the multimeter doesn’t register continuity when the thermostat is heated to the appropriate temperature, then the thermostat is defective and needs to be replaced.
- Remove the defective thermostat by disconnecting the wires connected to it. Take note of the wire connections and where they are connected so that you can connect the new thermostat properly.
- Install the new thermostat by connecting the wires to their corresponding terminals. Make sure that the thermostat is properly aligned with the heating element and that the screws are tight.
- Reassemble the front or back panel and plug the dryer back in.
- Test the dryer to ensure that it heats properly and doesn’t overheat.
Fixing the Timer
The timer in your dryer controls the duration of the drying cycle. If the timer is broken, it can cause the dryer to run too long or not at all. Here’s how you can fix a broken timer:
- Unplug the dryer and locate the timer, which is usually located on the control panel.
- Depending on your dryer model, you may need to remove the control panel to access the timer. Remove the screws or clips holding the panel in place.
- Once you’ve exposed the timer, use a multimeter to test for continuity. To do this, set the multimeter to the continuity setting and touch the probes to the two terminals on the timer. If the multimeter doesn’t register continuity, then the timer is broken and needs to be replaced.
- Remove the broken timer by disconnecting the wires connected to it. Take note of the wire connections and where they are connected so that you can connect the new timer properly.
- Install the new timer by connecting the wires to their corresponding terminals. Make sure that the timer is properly aligned and that the screws are tight.
- Reassemble the control panel and plug the dryer back in.
- Test the dryer to ensure that it runs for the correct duration and shuts off when the cycle is complete.
Troubleshooting the Gas Heater
If you have a gas dryer and it’s not starting due to an absence of gas supply or a malfunctioning gas igniter, troubleshooting the gas heater can help you identify and resolve the problem. Here are some steps you can take to troubleshoot the gas heater:
- Check the gas supply: Make sure that the gas supply to the dryer is turned on and that the gas valve is fully open. If the gas supply is interrupted or the valve is partially closed, the dryer won’t start.
- Inspect the gas line: Check the gas line for any leaks or damage. If there’s a leak or damage in the gas line, it can prevent gas from flowing to the dryer.
- Test the gas igniter: The gas igniter is responsible for igniting the gas to heat the dryer. Use a multimeter to test the igniter for continuity. If the igniter doesn’t register continuity, it’s defective and needs to be replaced.
- Check the flame sensor: The flame sensor is a safety component that detects whether the gas has been ignited. If the flame sensor is dirty or defective, it can prevent the gas from igniting. Clean the sensor or replace it if necessary.
- Inspect the gas valve: The gas valve controls the flow of gas to the dryer. If the gas valve is defective or clogged, it can prevent the gas from reaching the igniter. Clean the valve or replace it if necessary.
- Consult the user manual: Your dryer’s user manual may contain specific instructions for troubleshooting the gas heater. Follow the manufacturer’s instructions carefully.
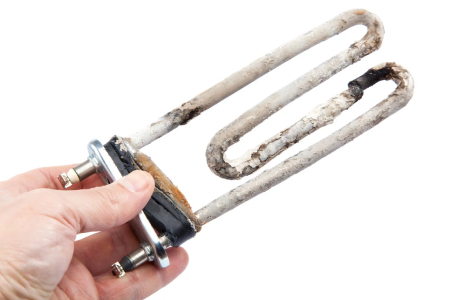
Repairing the Electric Heating Elements
If you have an electric dryer and it’s not starting due to a damaged heating element, you’ll need to replace the heating element to fix the problem. Here are some steps you can take to replace the heating element:
- Unplug the dryer: Always unplug the dryer from the power source before starting any repairs.
- Locate the heating element: The heating element is usually located on the back or bottom of the dryer. Refer to the user manual for specific instructions on locating the heating element.
- Remove the heating element: Depending on your dryer model, you may need to remove the back panel or the drum to access the heating element. Remove the screws or clips holding the panel or drum in place, and carefully remove the heating element.
- Disconnect the wires: Once you’ve removed the heating element, disconnect the wires connected to it. Take note of the wire connections and where they are connected so that you can connect the new heating element properly.
- Install the new heating element: Install the new heating element by connecting the wires to their corresponding terminals. Make sure that the heating element is properly aligned and that the screws or clips are tight.
- Reassemble the dryer: Reassemble the back panel or drum, and plug the dryer back in.
- Test the dryer: Test the dryer to ensure that it starts and that the heating element is working properly.
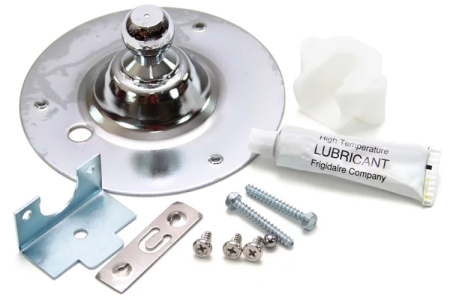
Fixing the Drum Bearing
The drum bearing supports the weight of the drum and allows it to rotate smoothly. Here’s how you can fix a faulty drum bearing:
- Unplug the dryer and locate the drum bearing, which is usually located at the back of the dryer drum.
- Depending on your dryer model, you may need to remove the front or back panel to access the drum bearing. Remove the screws or clips holding the panel in place.
- Once you’ve exposed the drum bearing, use a screwdriver or pliers to remove it. Take note of how it is positioned so that you can install the new one properly.
- Install the new drum bearing by positioning it correctly in the same place as the old one. Make sure that it is aligned properly and that the screws or clips are tight.
- Reassemble the front or back panel and plug the dryer back in.
- Test the dryer to ensure that the drum turns smoothly.
Servicing the Drum Rollers
Some steps to service the drum rollers:
- Turn off the dryer and unplug it from the electrical outlet.
- Locate the drum rollers, which are typically found at the back of the dryer’s drum.
- Remove the front panel of the dryer to access the drum rollers. Depending on your dryer model, this may involve removing screws or clips.
- Inspect the drum rollers for any signs of wear or damage, such as flat spots or cracks.
- If the drum rollers are worn or damaged, they will need to be replaced. Purchase replacement drum rollers that are compatible with your dryer model.
- Use a wrench or pliers to remove the retaining clips that hold the drum rollers in place.
- Remove the old drum rollers and install the new ones in the same location.
- Replace the retaining clips and ensure they are securely in place.
- Reattach the front panel of the dryer.
- Plug the dryer back into the electrical outlet and turn it on to test for proper operation.
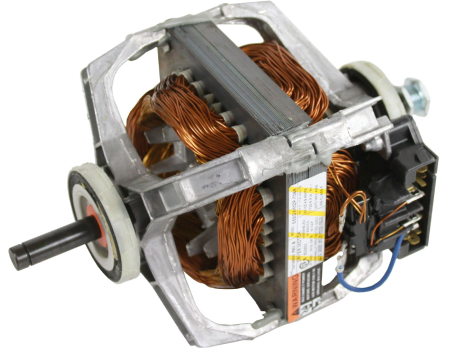
Repairing the Motor
If the dryer motor is faulty, the dryer won’t start or the drum won’t rotate. Here’s how you can replace the motor in your dryer:
- Unplug the dryer and locate the motor. The motor is usually located at the back of the dryer and is connected to the drum by a belt.
- Depending on your dryer model, you may need to remove the front or back panel to access the motor. Remove the screws or clips holding the panel in place.
- Once you’ve exposed the motor, use a multimeter to test it for continuity. Set the multimeter to the continuity setting and touch the probes to the two terminals on the motor. If the multimeter doesn’t register continuity, then the motor is faulty and needs to be replaced.
- Disconnect the motor from the dryer. Depending on your dryer model, you may need to remove the belt and other components to disconnect the motor.
- Install the new motor. Reconnect the motor to the dryer, making sure to connect the wires properly.
- Reassemble the front or back panel and plug the dryer back in.
- Test the dryer to ensure that it starts and that the drum rotates.
A non-starting dryer can be a frustrating problem, but there are several common causes that you can troubleshoot and fix yourself. By understanding the possible causes of a non-starting dryer and following the solutions provided in this guide, you can get your dryer up and running again without having to call a professional technician. However, if you’re not comfortable troubleshooting or repairing your dryer on your own, it’s always best to contact a professional for assistance. With the right knowledge and tools, you can get your dryer back to working properly in no time.