If you’re a homeowner or tenant who uses a dryer, you may have experienced the frustration of clothes taking too long to dry. Not only is it a time-consuming inconvenience, but it can also lead to higher energy bills and potentially damage your dryer. In this guide, we’ll explore the common causes of slow drying times and provide solutions to help you get your laundry dry in a timely manner.
Causes of a Dryer Taking Too Long to Dry Clothes
Overloaded Dryer
One of the most common culprits for slow drying times is an overloaded dryer. When too many clothes are crammed into the dryer, there simply isn’t enough space for the hot air to circulate properly. This lack of proper airflow can result in damp or even wet clothes, which can be frustrating and time-consuming to deal with.
To prevent this issue, it’s important to make sure you’re not overloading your dryer. Be sure to check the manufacturer’s recommendations for load size and leave some space for the air to circulate. In addition to prolonging drying times, overloading your dryer can also put a strain on the machine’s components, potentially leading to costly repairs down the line.
Insufficient Power Supply
A dryer requires a considerable amount of power to generate enough heat to dry clothes effectively. If the power supply is inadequate, the dryer won’t be able to generate the necessary heat, leading to prolonged drying times.
To start, check that your dryer is plugged into a dedicated outlet and not sharing a circuit with other high-energy consuming appliances. Sharing a circuit can cause an overload that affects the performance of all devices sharing that circuit. An overloaded circuit may also increase the risk of electrical accidents, such as tripping breakers or electrical fires.
Furthermore, it’s recommended to verify the voltage supplied to your dryer.
Clogged Lint Screen
When the lint screen is clogged, the dryer struggles to push the heated air through the clothes, causing moisture to linger longer. As a result, the clothes take longer to dry, and the dryer may consume more energy to compensate. In some cases, this can even cause the dryer to overheat, leading to potential safety hazards.
To prevent a clogged lint screen, it’s essential to clean it after every use. This promotes adequate airflow through the dryer, allowing it to operate efficiently and reduce the drying time.
It’s also crucial to inspect the lint screen regularly for signs of damage or wear. A damaged or torn lint screen can lead to poor drying results, as it won’t trap the lint and debris effectively. In such cases, it’s best to replace the lint screen promptly to ensure that the dryer operates at maximum efficiency.
Unsealed Drum
To diagnose an unsealed drum, run your hand along the inside of the dryer while it’s running. If you feel air escaping, it’s a sign that the drum seal is damaged or worn, causing air leaks that affect the dryer’s efficiency. It’s essential to address this issue promptly to avoid potential hazards and ensure that your dryer functions correctly.
There can be several reasons why the drum seal is damaged or worn out. One possible cause is regular wear and tear due to frequent use of the dryer. Over time, the drum seal can become brittle and crack, leading to air leaks. Additionally, if the dryer is overloaded or loaded incorrectly, it can put unnecessary pressure on the drum seal, causing it to fail.
Another reason for an unsealed drum is a faulty drum glide or slide. The drum glide or slide is a component that supports the drum and allows it to rotate smoothly. If it’s damaged, the drum can wobble, causing the seal to wear out prematurely and leading to air leaks.
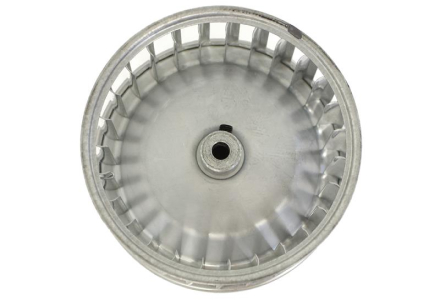
Defective or Broken Blower Wheel
A broken blower wheel can cause longer drying times. It moves hot air through the dryer and out the vent. Common causes of malfunction are wear and tear, overloading, and dust buildup. To diagnose the issue, turn off the dryer, remove the front panel, and look for damage. Check if the blower wheel spins freely. Regular maintenance like cleaning and inspecting the belt can prevent problems and extend the dryer’s life.
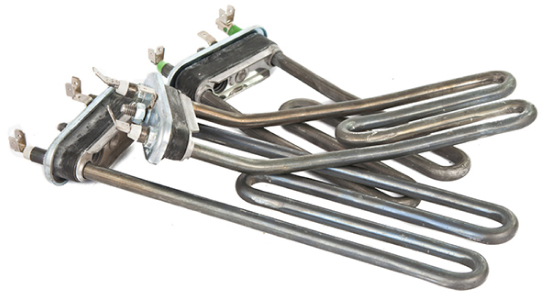
Burnt-Out or Dirty Heating Element
The heating element is a crucial component that generates the heat to dry clothes in the dryer. If it’s burnt-out or covered in dirt, it can cause longer drying times, resulting in more energy consumption and higher bills.
To do this, you’ll first need to turn off the dryer and remove the front panel. Check for any visible signs of wear and tear or damage to the heating element. If there is any dirt on the surface of the heating element, clean it using a soft brush, but be gentle to avoid causing any further damage.
However, if the heating element is burnt-out, it’s time to replace it.
Unsealed Door
A dryer door needs to seal tightly to ensure that hot air is contained inside and not escaping. If hot air is escaping through the door, it means that your dryer isn’t functioning as efficiently as it should be, leading to increased energy bills and longer drying times.
To check if your dryer door is sealed properly, you can run your hand along the inside of the door while it’s running. If you feel hot air escaping, it’s time to replace the door seal. Door seals can become damaged over time due to regular use or because of wear and tear.
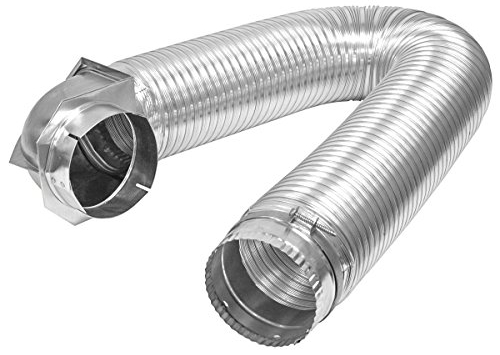
Restricted Airflow
Restricted airflow occurs when the dryer vent is clogged with lint or other debris, or if the vent is too long or has too many turns.
To diagnose restricted airflow, you’ll need to inspect the dryer vent for any visible signs of lint or debris. If you notice any buildup, it’s time to clean the dryer vent. You can do this yourself using a vent brush or hire a professional to do it for you. It’s recommended that you clean your dryer vent at least once a year to prevent restricted airflow and maintain your dryer’s efficiency.
Clothes Too Wet After Washing
If your clothes are too wet after washing, it can also lead to longer drying times. This can happen if your washing machine isn’t spinning the clothes properly or if you’re using too much detergent. To prevent this, make sure you’re using the recommended amount of detergent and that your washing machine is functioning properly.
To diagnose why your clothes are too wet after washing, check if the clothes are evenly distributed in the machine and the machine isn’t overloaded. If this doesn’t solve the problem, check the filter and ensure it’s clean. If the issue persists, it may be due to a faulty spin cycle or a broken belt or motor. In this case, it’s best to contact a professional technician for assistance.
Incorrect Residual Moisture Level
Here’s what you need to know to fix this problem:
- Check your dryer settings: Make sure you’re using the correct settings for the type of clothes you’re drying. Some fabrics require a lower heat setting to prevent damage, while others need a higher heat setting to dry thoroughly.
- Clean your dryer’s lint filter: A clogged lint filter can cause your dryer to overheat and reduce its efficiency. Make sure to clean the lint filter after every use to prevent this from happening.
- Inspect your dryer’s vent: Check that the vent leading outside is clear of obstructions and not clogged with lint. A blocked vent can cause hot air to back up into the dryer, reducing its effectiveness.
- Verify that the moisture sensor is functioning properly: The moisture sensor is responsible for detecting the amount of moisture in the clothes and adjusting the drying time accordingly. If it’s not functioning correctly, it can lead to an incorrect residual moisture level and longer drying times.
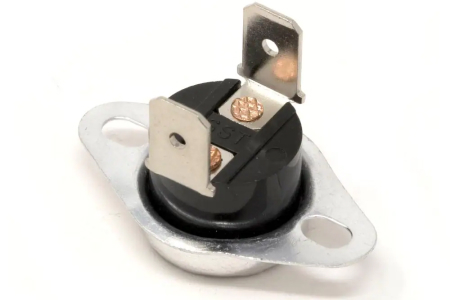
Faulty Thermostat
A faulty thermostat may be to blame. Here’s how to diagnose the problem:
- Turn off the dryer and unplug it from the power source.
- Locate the thermostat, which is usually located on the back of the dryer or on the blower housing.
- Remove the thermostat from the dryer by disconnecting any wires or screws holding it in place.
- Use a multimeter to test the thermostat for continuity. Set the multimeter to the “Ohms” setting and touch the probes to the terminals on the thermostat. If the multimeter reads “0” or very low resistance, the thermostat is functioning properly. If there is no continuity or a high resistance reading, the thermostat is faulty and needs to be replaced.
Defective Dryer Gas Valve Solenoid
A defective gas valve solenoid may be to blame. Here’s how to diagnose the problem:
- Turn off the gas supply to the dryer and unplug it from the power source.
- Locate the gas valve solenoid, which is usually located near the gas valve and burner assembly.
- Remove the gas valve solenoid from the dryer by disconnecting any wires or screws holding it in place.
- Use a multimeter to test the gas valve solenoid for continuity. If the multimeter reads “0” or very low resistance, the solenoid is functioning properly. If there is no continuity or a high resistance reading, the solenoid is defective and needs to be replaced.
Blown Dryer Thermal Fuse
- A blown thermal fuse may be the culprit. Here’s how to diagnose the problem:
- Turn off the dryer and unplug it from the power source.
- Locate the thermal fuse, which is usually located on the blower housing or near the heating element.
- Remove the thermal fuse from the dryer by disconnecting any wires or screws holding it in place.
- Use a multimeter to test the thermal fuse for continuity. If there is no continuity or a high resistance reading, the thermal fuse is blown and needs to be replaced.
Clogged Dryer Vents
- A clogged dryer vent may be to blame. Here’s how to diagnose the problem:
- Check for lint buildup: If the lint filter is clean but you still see lint, it may be clogging the dryer vent.
- Inspect the dryer vent hose: Disconnect the dryer vent hose from the back of the dryer and inspect it for any signs of clogging.
- Check the outside vent hood: Go outside and look at the vent hood on the exterior of your home.
- Test the dryer: After checking the lint filter, vent hose, and vent hood, run a test cycle on your dryer to see if the problem is resolved.
Solutions for a Dryer Taking Too Long to Dry Clothes
Clean the Lint Filter
One easy solution to this problem is to clean the lint filter. Here’s how:
- Locate the lint filter: The lint filter is typically located inside the dryer door or on the top of the dryer.
- Remove any lint buildup: Use your fingers or a soft-bristled brush to remove any lint buildup from the filter.
- Clean the filter with soap and water: If the lint filter is clogged with residue from dryer sheets or fabric softeners, you can clean it with warm, soapy water. Rinse the filter thoroughly and allow it to air dry completely before using it again.
- Repeat after every use: Make sure to clean the lint filter after every use to ensure proper airflow through the dryer.
Replace the Drum Seal
One potential solution to this problem is to replace the drum seal. Here’s how:
- Unplug the dryer
- Locate the drum seal: The drum seal is typically located around the opening of the dryer drum.
- Remove the old drum seal: Use a putty knife or other flat tool to pry the old drum seal off the drum. Make sure to remove all adhesive residue from the drum before installing the new seal.
- Install the new drum seal: Apply a small amount of adhesive to the new drum seal and press it firmly onto the drum.
- Allow the adhesive to dry
Clean or Replace the Door Seal
- Here’s how to clean or replace the door seal:
- Unplug the dryer.
- Inspect the door seal: Look for any signs of wear, damage, or buildup on the door seal. If the seal is simply dirty or has buildup, clean it thoroughly with a damp cloth and mild detergent.
- Replace the door seal: Consult your dryer’s manual or contact a professional to ensure you purchase the correct replacement seal.
- Install the new door seal: Follow the manufacturer’s instructions for installing the new door seal. Make sure the seal is properly aligned and firmly in place.
- Test the door seal: After cleaning or replacing the door seal, test the dryer to ensure that the door is sealing properly and hot air isn’t escaping.
Clean or Replace the Blower Wheel
Here is a list of steps to clean or replace the blower wheel in your dryer:
- Unplug the dryer from the electrical outlet.
- Remove the front panel of the dryer to access the blower wheel.
- Locate the blower wheel, which is typically located near the bottom of the dryer and looks like a large fan blade.
- Use a soft-bristled brush or vacuum to remove any visible debris from the blower wheel.
- Inspect the blower wheel for any signs of damage, such as bent or broken blades.
- If the blower wheel is severely clogged or damaged, it may need to be replaced entirely.
- To replace the blower wheel, follow the manufacturer’s instructions for your specific dryer model, as the process can vary depending on the make and model.
- Once the blower wheel has been cleaned or replaced, reattach the front panel of the dryer.
- Plug the dryer back into the electrical outlet.
- Turn the dryer on to test for proper airflow and drying efficiency.
Clean or Replace the Heating Element
Here are some steps to clean or replace the heating element:
- Unplug the dryer from the electrical outlet.
- Locate the heating element assembly, typically found in the back of the dryer.
- If the heating element is visibly dirty, use a soft-bristled brush or vacuum to remove any visible debris.
- If the heating element is visibly damaged or burnt out, it will need to be replaced.
- Replacement heating elements can be ordered online or purchased from a local appliance parts store.
- Follow the manufacturer’s instructions for your specific dryer model to replace the heating element.
- Once the heating element has been cleaned or replaced, reattach any parts that were removed and plug the dryer back into the electrical outlet.
- Turn the dryer on to test for proper heat generation and drying efficiency.
Inspect and Clean Dryer Vents
Regularly inspecting and cleaning your dryer vents is essential to maintaining proper airflow and preventing potential hazards. Here are some steps to inspect and clean your dryer vents:
- Turn off the dryer and unplug it from the electrical outlet.
- Pull the dryer away from the wall to access the vent duct.
- Disconnect the vent duct from the back of the dryer.
- Inspect the vent duct for any signs of damage, such as tears or holes.
- Use a vacuum or brush to remove any visible debris from the vent duct.
- Reconnect the vent duct to the back of the dryer.
- Inspect the outside vent hood for any obstructions, such as bird nests or debris.
- Use a brush or vacuum to remove any visible obstructions from the vent hood.
- Reconnect the vent hood to the vent duct.
Ensure the Vent Flap Opens Properly
The vent flap on the outside of your home is a critical component of your dryer vent system. It’s designed to allow air to flow out of the dryer vent and prevent outside elements from entering the vent. If the vent flap is not functioning correctly, it can result in longer drying times and decreased efficiency. Some steps to ensure the vent flap opens properly:
- Locate the vent flap on the outside of your home.
- Inspect the vent flap for any signs of damage or obstruction.
- Remove any visible debris or obstruction from the vent flap, such as leaves or twigs.
- Check the flap’s movement by blowing into the vent pipe. The flap should open easily and close tightly.
- If the vent flap is not functioning correctly, it may need to be replaced.
It’s crucial to ensure the vent flap opens and closes properly to maintain proper airflow and efficiency in your dryer.
Avoid Overloading the Dryer Drum
Overloading your dryer can cause a range of issues, from increased drying times to potential damage to the dryer itself. Some steps to avoid overloading the dryer drum:
- Check your dryer’s owner’s manual for the recommended load size.
- Sort your laundry by weight and fabric type before putting them in the dryer.
- Shake out each item of clothing before placing them in the dryer to prevent clumping.
- Fill the dryer drum to no more than 2/3 of its capacity.
- Leave some space in the drum to allow for proper airflow.
- Consider drying heavy items like towels and blankets separately to prevent overloading the dryer.
Overloading your dryer can cause the heating element to fail, the motor to burn out, or even a fire to occur.
Locate and Test the Thermostat
If you suspect the thermostat is faulty, here are some steps to locate and test it:
- Turn off the dryer and unplug it from the electrical outlet.
- Locate the thermostat, which is typically found on the blower housing or the heating element assembly.
- Use a multimeter to test the thermostat for continuity. Set the multimeter to the ohms setting and touch the probes to each end of the thermostat.
- If the thermostat does not show continuity, it’s faulty and needs to be replaced.
- Replacement thermostats can be ordered online or purchased from a local appliance parts store.
- Follow the manufacturer’s instructions for your specific dryer model to replace the thermostat.
- Once the thermostat has been replaced, plug the dryer back into the electrical outlet and turn it on to test for proper temperature regulation.
Inspect and Clean the Moisture Sensor
If the sensor is dirty or malfunctioning, it can result in longer drying times and decreased efficiency. Some steps to inspect and clean the moisture sensor:
- Turn off the dryer and unplug it from the electrical outlet.
- Locate the moisture sensor, which is typically found inside the dryer drum.
- Inspect the sensor for any signs of damage or debris.
- Use a soft cloth or cotton ball moistened with rubbing alcohol to clean the sensor.
- Check the sensor’s performance by running a load of clothes through a drying cycle.
- If the dryer still seems to be over-drying or taking longer than usual to dry, the moisture sensor may need to be replaced.
If you’re experiencing longer drying times with your dryer, there could be a variety of causes. From overloaded dryers to clogged vents, there are many things that can impact your dryer’s performance. By understanding the common causes and solutions for a dryer taking too long to dry clothes, you can improve your dryer’s efficiency and get your laundry dry in a timely manner. Remember to clean the lint filter after every use, avoid overloading the dryer drum, and regularly clean the dryer vents to prevent clogs. If you’re unsure how to address any of these issues, it’s best to contact a professional for assistance.