A dryer stops turning during a cycle for a variety of reasons. In this section, we will delve into the most common causes of dryer stopping issues, helping you identify the root of the problem.
Reasons Why a Dryer Stops Turning During a Cycle
Burnt-out Thermal Fuse
One common issue that can cause a dryer to stop mid-cycle is a burnt-out thermal fuse. This crucial component acts as a safety mechanism to prevent the dryer from overheating, and when it fails, the dryer may stop spinning altogether. To diagnose whether the thermal fuse is the culprit, you will need to conduct a few simple tests.
First, unplug the dryer and locate the thermal fuse, which is typically found on the blower housing or exhaust duct.
Check for signs of damage or discoloration, which can indicate that the fuse has burnt out. Using a multimeter, test the fuse for continuity, and if it fails the test, the thermal fuse will need to be replaced.
It is important to note that a blown thermal fuse can be a symptom of an underlying issue, such as a clogged dryer vent or faulty heating element. Therefore, it is crucial to address the root cause of the problem to prevent future failures.
Failing Drive Motor
One of the most critical components of a dryer is the drive motor, responsible for spinning the dryer drum during a cycle. Diagnosing a failing drive motor requires a few simple
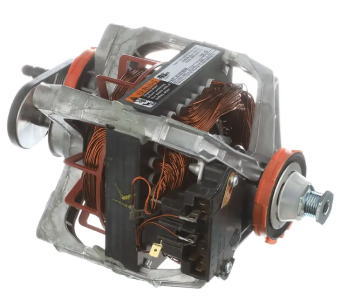
steps.
First, unplug the dryer and manually rotate the drum to check for any resistance or unusual sounds. If the drum is difficult to move or makes grinding or squeaking noises, this could indicate a problem with the drive motor.
Another common sign of a failing motor is overheating or a humming sound when attempting to start the dryer. To test the drive motor, you can use a multimeter to check for continuity, which will determine if the motor is faulty. If the drive motor fails this test, it will need to be replaced.
It is important to note that a failing drive motor can be caused by various underlying issues, such as a broken belt or a clogged dryer vent.
Therefore, it is crucial to identify and address the root cause of the problem to prevent future motor failures. In conclusion, diagnosing a failing drive motor is a simple process, and replacing it should restore your dryer’s proper functioning.
Malfunctioning Dryer Timer
If the dryer timer malfunctions, it can cause the dryer to stop mid-cycle or not turn on at all. Diagnosing a malfunctioning dryer timer requires a few simple steps.
First, unplug the dryer and remove the timer knob to access the timer. Inspect the timer for any signs of physical damage or wear and tear.
Next, use a multimeter to test the timer for continuity. If the timer fails the continuity test, it is likely faulty and needs to be replaced.
Another common issue with a faulty timer is erratic behavior, such as starting and stopping at random intervals or not advancing through the cycle properly. To diagnose this issue, observe the dryer during a cycle and note any irregularities in the timing.
A malfunctioning timer can be caused by various underlying issues, such as a broken timer motor or a faulty control board. Therefore, it is crucial to identify and address the root cause of the problem to prevent future timer failures.
Additional Information:
- If the timer is still functioning but advancing too slowly or quickly, it may be due to a problem with the motor or the heating element, and those components should be checked as well.
- Some dryers have a separate timer motor that can also malfunction and cause issues with the timer. This motor can be tested separately with a multimeter.
Overheating Dryer
An overheating dryer is a common problem that can cause the dryer to pause mid-cycle. Overheating can result from various issues such as a malfunctioning thermostat, lint buildup, or blocked vents.
An overheated dryer may shut off automatically to prevent damage or a potential fire hazard.
Diagnosing an overheating dryer requires a few simple steps. First, unplug the dryer and inspect the vents and exhaust ducts for any blockages. A clogged vent restricts airflow, causing the dryer to overheat.
Next, check the dryer’s thermostat with a multimeter to test for continuity. A faulty thermostat may cause the dryer to overheat, and it needs to be replaced. Lint buildup inside the dryer can also cause overheating, so cleaning the lint filter and dryer vents regularly is crucial.
Additionally, the dryer’s heating element may malfunction and cause the dryer to overheat. To diagnose this issue, use a multimeter to check the heating element’s continuity.
Regular maintenance and cleaning can help prevent an overheating dryer. It is recommended to clean the lint filter after every load and clean the dryer’s vents at least once a year.
Issues with Condensed and Condenser Tray
Dryers with a heat pump or condenser technology collect moisture in a condenser tray during the drying cycle. If the tray is full or the condensed water system is blocked, the dryer may stop spinning.
Diagnosing issues with the condensed water system requires a few simple steps. First, unplug the dryer and locate the condenser tray. Check if it is full and needs to be emptied.
Next, remove the tray and inspect the condensed water system for any blockages. A clogged water system can cause the dryer to stop spinning.
Clean the water system by rinsing it under running water or using a soft brush to remove any buildup. It is important to clean the water system regularly to prevent blockages.
Additionally, some dryers have a sensor that detects when the condenser tray is full, and it may cause the dryer to stop spinning if it detects an issue. To diagnose this issue, refer to the dryer’s user manual and follow the instructions for resetting the sensor.
If the issue persists despite cleaning the condenser tray and water system, it may be due to a faulty sensor or a problem with the dryer’s pump, and those components should be checked as well.
Faulty Power Supply
If your dryer is not turning, it could be due to a faulty power supply. A power outage, tripped circuit breaker, or blown fuse can cause the dryer to stop functioning.
To diagnose this issue, start by checking the power supply. Make sure that the dryer is plugged in and that the outlet is receiving power. If the outlet is not working, test other outlets in the room to determine if the issue is with the dryer or the power supply.
If the outlet is working, check the dryer’s circuit breaker. A tripped circuit breaker can cause the dryer to stop functioning. To reset the circuit breaker, turn it off and then back on again. If the circuit breaker trips again, there may be an underlying electrical issue that needs to be addressed.
Another potential cause of a faulty power supply is a blown fuse. Locate the dryer’s fuse box and check if any of the fuses have blown. Replace any blown fuses with new ones of the same amperage.
If the dryer still doesn’t turn on after checking the power supply, it may be due to an issue with the control board, door switch, or other components, and those components should be checked as well.
Faulty Door Latch
The door latch is designed to keep the door securely closed during operation, and if it is broken or malfunctioning, the dryer may detect an open door and stop the cycle.
To diagnose this issue, start by inspecting the door latch. Check if it is damaged, worn, or loose. If the latch appears to be in good condition, test it by closing the dryer door and making sure that it clicks securely into place.
If the door latch is the issue, it will need to be replaced. To do this, unplug the dryer and remove the door latch assembly. Install the new latch assembly and make sure that it clicks securely into place.
Some dryers have a separate door switch that can also malfunction and cause issues with the latch. This switch can be tested separately with a multimeter.
Faulty Drive Belt
The drive belt wraps around the dryer drum and the drive motor, enabling the motor to turn the drum.
To diagnose this issue, start by unplugging the dryer and removing the front panel to access the drive belt. Check if the belt is broken, loose, or worn. If the belt appears to be in good condition, test it by manually rotating the drum. If the drum does not turn, the belt may be slipping or broken.
If the drive belt is the issue, it will need to be replaced. To do this, first, note the belt’s routing before removing it from the dryer. Install the new belt by following the manufacturer’s instructions and routing it correctly around the drum and drive motor.
It is important to note that a faulty drive belt can be caused by various underlying issues, such as a worn drum roller or a malfunctioning tensioner pulley. Therefore, it is crucial to identify and address the root cause of the problem to prevent future belt failures.
It is recommended to replace the drive belt every 5-7 years to prevent wear and tear.
Damaged Moisture Sensor
Test the sensor for physical damage and continuity with a multimeter. If the sensor fails the test, refer to the user manual for replacement instructions.
Note that a damaged moisture sensor can be a symptom of underlying issues like a malfunctioning control board or wiring issues. Check for these problems to prevent future sensor failures.
Damaged Drum Roller
To diagnose the issue, access the rollers and check for wear or damage. Replace the damaged rollers by following the manufacturer’s instructions and positioning them correctly.
Note that damaged drum rollers can be a symptom of underlying issues like a worn belt or malfunctioning idler pulley. Check for these problems to prevent future roller failures.
Replace all of the drum rollers at once to prevent uneven wear and tear.
Solutions for a Dryer That Stops Turning During a Cycle
After identifying the root cause of your dryer stopping issues, it’s time to address the problem and get your dryer back in working order. In this section, we will provide step-by-step solutions for each of the issues discussed earlier.
Test and Replace the Thermal Fuse
- Unplug the dryer from the power source.
- Locate the thermal fuse, usually found on the blower housing or near the heating element.
- Use a multimeter to test the fuse for continuity. If it does not have continuity, it needs to be replaced.
- Replace the faulty thermal fuse with a new one, ensuring it has the same specifications as the original.
- Reassemble the dryer and plug it back in.
Inspect, Clean, or Replace the Drive Motor
- Unplug the dryer from the power source.
- Remove the dryer’s back panel or front panel, depending on the model, to access the drive motor.
- Inspect the motor for visible damage or signs of overheating.
- Clean the motor and surrounding area of any dust or debris buildup.
- If the motor appears damaged or continues to overheat, consider replacing it with a new one.
- Reassemble the dryer and plug it back in.
Replace the Dryer Timer
- Unplug the dryer from the power source.
- Locate the timer, usually found behind the control panel.
- Remove the control panel to access the timer.
- Disconnect the timer’s wiring harness.
- Replace the faulty timer with a new one.
- Reconnect the wiring harness, reassemble the control panel, and plug the dryer back in.
Address Overheating Issues
- Regularly clean the lint filter and dryer vent to prevent lint buildup.
- Inspect the thermostat for signs of malfunction and replace it if necessary.
- Ensure proper ventilation around the dryer to prevent overheating.
- Clean the dryer’s interior components, such as the blower housing and motor, to prevent dust buildup.
Clean and Maintain the Condensed and Condenser Tray
- Unplug the dryer from the power source.
- Locate and remove the condenser tray.
- Empty the tray of any collected water.
- Clean the tray and surrounding area to remove any debris or blockages.
- Reinstall the tray and plug the dryer back in.
Check and Restore the Power Supply
- Ensure the dryer is properly plugged into the power outlet.
- Check the circuit breaker or fuse box for any tripped breakers or blown fuses. Reset or replace them as necessary.
- If the power supply issue persists, contact a professional electrician to inspect and address the problem.
Replace the Faulty Door Latch
- Unplug the dryer from the power source.
- Locate the door latch and remove it from the dryer.
- Replace the faulty latch with a new one.
- Reassemble the dryer and plug it back in.
Replace the Drive Belt
- Unplug the dryer from the power source.
- Remove the dryer’s front panel or top panel, depending on the model, to access the drive belt.
- Inspect the belt for wear or damage, and replace it if necessary.
- Reassemble the dryer and plug it back in.
Replace the Damaged Moisture Sensor
- Unplug the dryer from the power source.
- Locate the moisture sensor, usually found near the lint filter or inside the drum.
- Remove the sensor and replace it with a new one.
- Reassemble the dryer and plug it back in.
Replace the Damaged Drum Roller
- Unplug the dryer from the power source.
- Remove the dryer’s front panel or top panel, depending on the model, to access the drum rollers.
- Inspect the rollers for wear or damage, and replace them if necessary.
- Lubricate the new rollers with a high-temperature grease to ensure smooth operation.
- Reassemble the dryer and plug it back in.
By following these steps, you can effectively troubleshoot and resolve the common issues that cause a dryer to stop turning during a cycle. Regular maintenance and cleaning will also help prevent future problems, ensuring your dryer operates efficiently and effectively. Keep this beginner’s guide handy to diagnose and address any dryer spinning problems you may encounter.