If your dryer drum won’t turn or stops turning during a cycle, it can be frustrating and inconvenient. A non-spinning dryer can cause delays in your laundry routine and may require a professional repair service. However, before you call in a technician, there are some troubleshooting steps you can take to diagnose and potentially fix the issue. In this guide, we will explore the common reasons for a dryer not spinning and provide solutions to help you get your machine up and running again.
Common Reasons for a Non-Spinning Dryer
There are several potential causes for a dryer not spinning. Some issues are simple and easy to fix, while others may require the assistance of a professional technician. Let’s take a closer look at some of the most common reasons for a non-spinning dryer.
Worn-out Drum Rollers
One common reason for a dryer not spinning is worn-out drum rollers. Here are some steps to diagnose the problem:
- Unplug the Dryer
- Open the Cabinet: Locate the cabinet of the dryer and open it. For most dryers, this is done by removing the screws that hold the front and back panels in place.
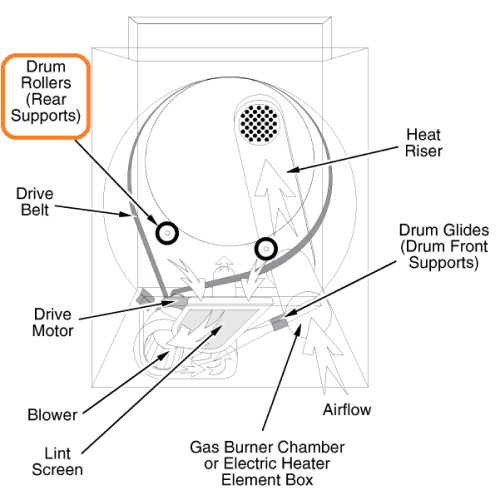
- Locate the Rollers: The drum rollers are located on the rear bulkhead of the dryer. They support the drum as it rotates.
- Inspect the Rollers: Check the rollers for wear and damage. Look for any flat spots or signs of wear on the surface of the rollers. If the rollers are worn or damaged, they will need to be replaced.
Broken Drive Belt
When a dryer drum fails to turn, it can be an indication of a broken drive belt. The drive belt is a crucial component of the dryer that is responsible for turning the drum. Steps to diagnose the problem:
- Unplug the Dryer
- Open the Cabinet: Locate the cabinet of the dryer and open it. For most dryers, this is done by removing the screws that hold the front and back panels in place.
- Inspect the Drive Belt: The drive belt is a long, thin belt that wraps around the drum, motor, and tensioner pulley. Look for any signs of wear, fraying, or breakage.
- Check the Tensioner Pulley: The tensioner pulley keeps the drive belt tight. If the pulley is loose or worn out, it can cause the belt to break. Check the pulley for wear or damage.
Worn-out Roller Axles
The roller axles are responsible for securing the drum rollers and enabling them to rotate smoothly. To diagnose this issue, you can follow these steps:
- Disconnect the Dryer.
- Access the Cabinet: Find the dryer’s cabinet and open it by taking off the screws that secure the front and back panels for most models.
- Inspect the Roller Axles: The roller axles are located on the rear bulkhead of the dryer. They keep the drum rollers in position and permit them to turn without difficulty. Examine the axles for any indications of wear or damage.
- Check the Drum Rollers: At the same time, investigate the drum rollers for any signs of wear or damage. If the rollers are worn or damaged, they will need to be replaced along with the roller axles.
Worn-out Drum Glides
A dryer’s failure to rotate may be due to worn drum glides. These small plastic pieces support the front of the drum during rotation. To diagnose this issue, follow these steps:
- Unplug the dryer to prevent electrical accidents.
- Open the cabinet by removing the screws that secure the front and back panels.
- Inspect the drum glides at the front of the drum for any signs of wear, damage, or cracking. Worn or damaged glides can cause binding, squeaking, or a failure to rotate.
- Check the drum belt for any signs of wear or damage, which can also cause rotation issues.
- If the drum glides require replacement, refer to the manual. Replace all glides to ensure uniform wear and prevent future problems.
Worn-out Drum Bearings
If your dryer fails to rotate, it may be due to worn drum bearings. These bearings support the drum and can deteriorate over time. To diagnose this issue, follow these steps:
- Unplug the dryer to avoid electrical accidents.
- Open the cabinet by removing the screws that hold the front and back panels.
- Inspect the drum bearings at the back of the drum for wear or damage, such as rust or scoring. Damaged bearings can cause the drum to bind, squeak, or not rotate.
- Check the belt and rollers for wear or damage, which can also cause rotation issues.
- Replace all bearings to ensure uniform wear and prevent future problems.
Broken Motor
If your dryer won’t spin, it could be due to a broken motor. The motor turns the dryer drum and can wear out over time. To diagnose this issue, follow these steps:
- Unplug the dryer to avoid electrical accidents.
- Open the cabinet by removing the screws that hold the front and back panels.
- Inspect the motor at the back of the dryer for damage or burning. Replace it if it is damaged or burnt.
- Check the belt and rollers for wear or damage, which can also cause rotation issues.
- Test the motor for continuity using a multimeter. A lack of continuity means a broken motor that requires replacement.
Damaged Idler Pulley
When the idler pulley is damaged, it can cause the drive belt to slip and halt the spinning of the dryer drum. To pinpoint the problem, you can use the following steps:
- Disconnect the dryer from its power source to prevent electrical accidents.
- Access the enclosure by taking out the screws holding the front and back panels.
- Inspect the idler pulley positioned near the motor for any indications of damage, wear, or distortion, and swap it out if necessary.
- Additionally, examine the rollers and belt for any wear or damage, since they can also obstruct the drum from rotating.
Damaged Moisture Sensor
A damaged moisture sensor can cause a dryer to fail to spin. Moisture sensors detect the level of moisture in the drum and adjust the drying time accordingly. Here are some steps to diagnose the problem:
- Refer to the User Manual: Refer to the user manual of your dryer and follow the instructions to test the moisture sensor.
- Test the Moisture Sensor: Perform the test on the moisture sensor as per the manual’s instructions. A faulty sensor can cause the dryer to stop spinning.
- Check the Drum Belt and Rollers: While checking the moisture sensor, also check the belt and rollers for signs of wear or damage. A worn-out belt or damaged rollers can cause the drum to stop rotating.
Damaged Thermal Fuse
When your dryer fails to rotate, it might be due to a damaged thermal fuse, which is a safety mechanism that prevents overheating. To diagnose the problem, follow these steps:
- Prior to conducting any inspection or repair, unplug the dryer to avoid electrical hazards.
- Open the enclosure by taking off the screws that secure the front and back panels.
- Locate the thermal fuse, which is typically found on the blower housing or exhaust duct. To find it, refer to the user manual.
- Using a multimeter, test the thermal fuse for continuity. A lack of continuity implies that it is defective and needs replacement.
- If the thermal fuse is found to be faulty, also examine the exhaust duct or blower housing for any obstructions that could have caused overheating.
Clogged Vent
A clogged vent can prevent a dryer from spinning by restricting airflow and causing the thermal fuse to trigger. Follow these steps to diagnose the issue:
- Inspect the vent hose for blockages like lint or debris that can cause the dryer to overheat.
- Check the exterior vent for any blockages such as debris or bird nests that restrict airflow.
- Clean the vent with a vent cleaning brush or vacuum to remove any obstructions.
- Test the dryer by turning it on to check if the drum is spinning after cleaning the vent.
If the drum is still not spinning, refer to other possible causes of the issue.
Faulty Start Switch
If your dryer is not spinning, a faulty start switch may be the reason. Here are the steps to diagnose the issue:
- To avoid electrical accidents, unplug the dryer before performing any inspection or repair.
- Open the dryer cabinet by removing the screws holding the front and back panels.
- Locate the start switch, which is usually on the control panel or near the motor. Check the user manual if you’re unsure where to find it.
- Test the start switch for continuity using a multimeter. If there’s no continuity, it indicates that the switch is faulty and needs to be replaced.
- If the start switch is faulty, examine the wiring for damage or disconnection.

Solutions for a Non-Spinning Dryer
Once you have identified the cause of your dryer not spinning, you can take steps to fix the issue. Some solutions are simple and can be done by the homeowner, while others may require the assistance of a professional technician. Let’s take a closer look at some of the solutions for a non-spinning dryer.
Check the Power Supply
If your dryer is not functioning properly, the first step is to check the power supply. Here are some steps to check the power supply:
- Make sure the dryer is plugged into a working electrical outlet.
- Check the power cord for any signs of damage or wear.
- Inspect the outlet for any visible damage or loose connections.
- Test the outlet with a voltage meter to ensure that it is providing the correct voltage (usually 240 volts).
- If the outlet is not providing the correct voltage, try resetting the circuit breaker or replacing the fuse.
- If the power supply is functioning properly, move on to the next troubleshooting step.
Replace the Drive Belt
If the drive belt of your dryer is worn out or broken, it will require a replacement. Here are the steps you can follow to replace the drive belt:
- Switch off the dryer and unplug it from the electrical outlet to avoid any electrical accidents.
- Locate the drive belt, which is typically situated around the drum and motor pulley.
- Consult your dryer’s user manual for specific instructions on how to remove and replace the drive belt.
- Buy the correct replacement belt for your dryer model.
- Use a screwdriver or any other suitable tool to loosen the tensioner and take out the old drive belt.
- Put the new drive belt around the drum and motor pulley.
- Use the tensioner to tighten the new drive belt.
- After installing the new drive belt, rotate the drum by hand to ensure proper alignment.
- Reconnect the dryer to the electrical outlet and turn it on to verify its proper functioning.
Check the Drum Rollers
If the drum rollers are worn or damaged, they can cause the dryer to make loud noises or stop rotating altogether. Here are some steps to check and replace the drum rollers:
- Turn off the dryer and unplug it from the electrical outlet.
- Locate the drum rollers, which are typically found on the back or front of the dryer drum.
- Inspect the drum rollers for any signs of wear or damage, such as flat spots or cracks.
- If the drum rollers are worn or damaged, refer to your dryer’s user manual for specific instructions on how to remove and replace them.
- Purchase the correct replacement rollers for your specific dryer model.
- Use a screwdriver or other tool to remove the old drum rollers.
- Install the new drum rollers in the same location as the old ones.
- Make sure the rollers are securely in place and rotate smoothly.
- Plug the dryer back into the electrical outlet and turn it on to test for proper operation.
Replacing the drum rollers is essential to maintaining proper functionality and efficiency in your dryer. Worn or damaged drum rollers can cause the dryer to make loud noises or stop rotating altogether, resulting in longer drying times and decreased efficiency.
Replace the Drum Glides
Some steps to replace the drum glides:
- Turn off the dryer and unplug it from the electrical outlet.
- Locate the drum glides, which are typically found on the front edge of the drum.
- Inspect the drum glides for any signs of wear or damage, such as cracks or chips.
- If the drum glides are worn or damaged, refer to your dryer’s user manual for specific instructions on how to remove and replace them.
- Purchase the correct replacement glides for your specific dryer model.
- Use a screwdriver or other tool to remove the old drum glides.
- Install the new drum glides in the same location as the old ones.
- Make sure the glides are securely in place and the drum rotates smoothly.
- Plug the dryer back into the electrical outlet and turn it on to test for proper operation.
Check and Replace the Idler Pulley
As time passes, the idler pulley can suffer from wear and tear, leading to the drive belt slipping or breaking. The following steps can help you check and replace the idler pulley:
- To prevent electrical hazards, turn off the dryer and unplug it from the electrical outlet.
- Find the idler pulley, which is typically located near the motor pulley.
- Inspect the idler pulley for any signs of damage or wear, such as cracks or chips.
- If the idler pulley is damaged or worn, refer to your dryer’s user manual for specific instructions on how to remove and replace it.
- Purchase the correct replacement pulley that corresponds to your dryer model.
- Use a screwdriver or any other suitable tool to remove the old idler pulley.
- Install the new idler pulley in the same location as the previous one.
- Ensure that the pulley is securely in place and that the drive belt is properly tensioned.
- Reconnect the dryer to the electrical outlet and turn it on to verify proper operation.
Check and Replace the Thermal Fuse
Checking and replacing the thermal fuse in your dryer is crucial for safety purposes as it prevents overheating and potential fires. To perform this task, follow these steps:
- To avoid electrical hazards, switch off the dryer and unplug it from the power source.
- Locate the thermal fuse, usually situated on the blower housing or exhaust duct.
- Use a multimeter to test the fuse for continuity by setting it to the ohms setting and touching the probes to either end of the fuse.
- If the thermal fuse shows no continuity, it signifies that it’s faulty and needs to be replaced.
- Consult your dryer’s user manual for specific instructions on how to remove and install the thermal fuse.
- Purchase the appropriate replacement fuse that corresponds to your dryer model.
- Place the new thermal fuse in the same location as the previous one.
- Ensure the fuse is securely in place before reconnecting the dryer to the electrical outlet.
- Turn the dryer on to verify proper operation.
Clean the Vent
A clogged dryer vent can cause longer drying times and potential fire hazards. It’s important to clean the vent regularly to maintain proper airflow and safety. Here are some steps to clean the vent:
- Turn off the dryer and unplug it from the electrical outlet.
- Disconnect the vent hose from the dryer. Depending on your dryer model, this may involve unscrewing clamps or pulling the hose off a connector.
- Use a vacuum or brush to remove any debris or lint from the hose and vent. Make sure to clean the vent all the way to the outside of the house.
- Inspect the vent for any damage or obstructions, such as bird nests or debris.
- Reconnect the vent hose to the dryer and secure it in place.
- Plug the dryer back into the electrical outlet and turn it on to test for proper operation.
Fix the Start Switch
If the start switch is faulty, it can prevent the dryer from starting or stopping mid-cycle. Here are some steps to fix the start switch:
- Turn off the dryer and unplug it from the electrical outlet.
- Locate the start switch, which is typically found on the control panel of the dryer.
- Check the start switch for any signs of damage or wear, such as cracks or breaks.
- Use a multimeter to test the start switch for continuity. Set the multimeter to the ohms setting and touch the probes to each end of the switch.
- If the start switch does not show continuity, it’s faulty and needs to be replaced.
- Refer to your dryer’s user manual for specific instructions on how to remove and replace the start switch.
- Purchase the correct replacement switch for your specific dryer model.
- Install the new start switch in the same location as the old one.
- Make sure the switch is securely in place and properly connected.
- Plug the dryer back into the electrical outlet and turn it on to test for proper operation.
Repair or Replace the Dryness Control Board
The dryness control board in your dryer is responsible for controlling the moisture sensor and other electronic components that regulate the drying cycle. Here are some steps to repair or replace the dryness control board:
- Turn off the dryer and unplug it from the electrical outlet.
- Locate the dryness control board, which is typically found on the control panel or back of the dryer.
- Check the dryness control board for any signs of damage, such as burnt or corroded components.
- Use a multimeter to test the dryness control board for continuity and voltage. Set the multimeter to the appropriate settings and touch the probes to the appropriate points on the board.
- If the dryness control board is faulty, it will need to be repaired or replaced. This should only be attempted by a qualified technician.
- Contact a qualified technician or the manufacturer for assistance with repairing or replacing the dryness control board.
A dryer not spinning can be a frustrating and inconvenient problem, but it is often one that can be diagnosed and fixed with a bit of troubleshooting. By understanding the common causes of a non-spinning dryer and the solutions available, homeowners can save time and money by fixing the problem themselves or knowing when to call in a professional technician. Remember to always follow safety precautions and refer to your dryer’s user manual for specific instructions. With a little effort, you can get your dryer back up and running in no time.