Understanding Refrigerator Cooling Problems
Several factors can leads to experiencing fridge cooling issues. The key topics covered in this article include refrigerator not cooling scenarios and related concerns.
- Power Source: One of the fundamental aspects to consider when troubleshooting refrigerator cooling issues. Your refrigerator relies on a steady and sufficient supply of electricity to operate efficiently.
- Door Seal Damage: The rubber gaskets that seal the refrigerator and freezer doors may deteriorate or sustain other types of damage, allowing warm air to enter the storage spaces. In order to maintain a low temperature, the refrigerator is compelled to work more.
- Temperature Settings: Inadequate cooling can result from incorrect thermostat settings. For optimum cooling performance, make sure that the temperatures in your refrigerator and freezer compartments are set appropriately.
- Unblocking Air Vents for Better Airflow: Proper airflow is crucial for even cooling throughout the refrigerator. Blocked air vents can disrupt the circulation of cold air, resulting in uneven temperatures and potential spoilage of food items.
- Evaporator Fan Problems: The evaporator fan is a vital component in your refrigerator’s cooling system. It’s responsible for circulating cold air from the evaporator coils throughout the fridge and freezer compartments. If the evaporator fan encounters issues, it can lead to cooling problems
- Dirty Condenser Coils: Over time, dust and debris can accumulate on the condenser coils located at the back or underneath the refrigerator. This buildup can hinder heat dissipation, making the refrigerator work harder to cool down. Regularly cleaning these coils can help maintain efficient cooling.
- The cooling system: in your refrigerator depends on refrigerant, which might leak. It is in charge of collecting heat from the refrigerator’s and freezer’s interior, keeping those compartments cold. The cooling effectiveness of your refrigerator, however, may suffer if there is a refrigerant leak.
Power Source
Causes and solutions of no power supply:
First and foremost, safety. Unplug or turn off the refrigerator’s power source before beginning any maintenance.
- Tripped Circuit Breaker:
Cause: A tripped circuit breaker in your home’s electrical panel can disconnect power to your refrigerator. This can happen due to overloading the circuit or a short circuit.
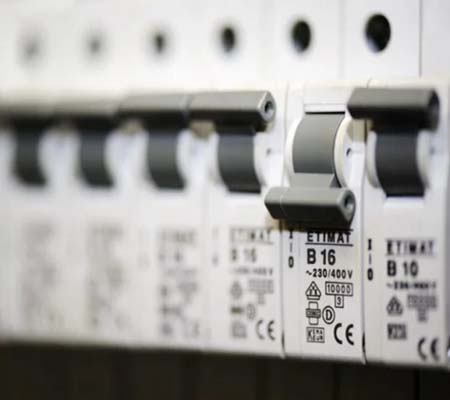
Solution: To fix this, locate your home’s electrical panel and check if the circuit breaker labeled for the refrigerator has tripped. If it has, reset it by turning it off and then back on. Ensure that the circuit is not overloaded and that the wiring is in good condition.
- Blown Fuse:
Cause: Some older homes may have fuses instead of circuit breakers. A blown fuse in the refrigerator’s electrical circuit can disrupt power.
Solution: Find the blown fuse in the electrical panel, then swap it out for a new one with the same amperage rating. Make sure the fuse box is kept in good working order and that your home’s wiring complies with code.
- Loose or Damaged Power Cord:
Cause: A loose or damaged power cord can prevent your refrigerator from receiving power. It could be unplugged or have frayed or damaged wiring.
Solution: First, check if the power cord is securely plugged into the electrical outlet. If it’s loose, plug it in properly. If the cord is damaged, it should be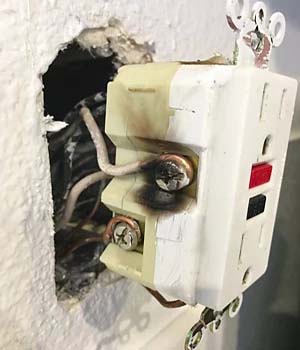 replaced immediately to avoid electrical hazards. Consult a qualified electrician or appliance technician for cord replacement.
- Faulty Outlet or Wiring:
Cause: Sometimes, the issue lies with the electrical outlet itself or the wiring behind it. Over time, outlets can wear out or become faulty.
Solution: Test the outlet by plugging in another appliance or device to see if it works. If not, you may need to replace the outlet or address wiring issues. Contact a licensed electrician to inspect and fix any wiring problems.
- GFCI Outlet Tripped:
Cause: Many modern kitchens have Ground Fault Circuit Interrupter (GFCI) outlets installed for safety. If a GFCI outlet trips, it will cut power to appliances connected to it.
Solution: Locate the GFCI outlet in your kitchen (typically with a test and reset button) and press the reset button. This should restore power to the outlet and your refrigerator.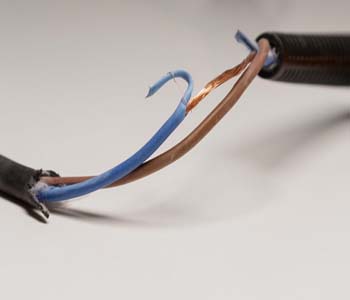
- Power Surge or Outage:
Cause: Power surges or outages can sometimes disrupt the electrical supply to your refrigerator.
Solution: Consider using surge protectors or uninterruptible power supplies (UPS) to protect your refrigerator from power fluctuations. After a power outage, wait a few minutes for the compressor to reset and start cooling again.
Damaged Door Seals
Causes of Damaged Door Seals:
- Wear and Tear: Over time, door seals can deteriorate due to regular use. They may crack, become brittle, or lose their flexibility, compromising their ability to seal the door effectively.
- Accidental Damage: Rough handling, pulling on the seals, or catching them on sharp objects can cause tears or deformities in the seals.
- Dirty or Sticky Residue: A buildup of dirt, food particles, or sticky residues along the door seals can not only damage them but also prevent
 them from forming a proper seal.
Signs of Damaged Door Seals:
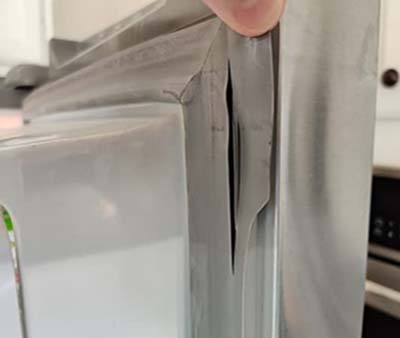
- Visible Damage: Inspect the door seals visually for cracks, tears, or deformities. Pay attention to any visible signs of wear and tear.
- Temperature Fluctuations: If your refrigerator experiences frequent temperature fluctuations or struggles to maintain a consistent cold temperature, it may be a sign of compromised door seals.
- Condensation or Frost: Damaged door seals can allow warm, moist air to enter the refrigerator, leading to condensation or frost buildup inside.
Solutions for Damaged Door Seals
- Inspect the Seals: Carefully examine the door seals for visible signs of damage, such as cracks, tears, or wear and tear. Run your fingers along the seal to feel for any irregularities.
- Clean the Seals: Over time, dirt and debris can accumulate on the door seals, compromising their ability to create an airtight seal. Use a mixture of warm water and mild detergent to clean the seals thoroughly. Wipe away any residue and ensure they are dry before proceeding
- Repair Small Tears: If you discover small tears or gaps in the seals, you may be able to repair them temporarily using silicone sealant or adhesive. However, keep in mind that this is a temporary solution, and replacing the seals is the best long-term option.
- Replace Damaged Seals: In most cases, damaged door seals should be replaced to restore the fridge’s efficiency and temperature control. Replacement seals can often be purchased from the manufacturer or appliance parts stores.
- Check Door Alignment: Ensure that the refrigerator doors are properly aligned and close tightly. Misaligned doors can put unnecessary stress on the seals and cause damage.
Temperature Settings: Adjusting for Optimal Cooling
Proper temperature settings are essential for maintaining the freshness and safety of the food stored in your refrigerator and freezer. Incorrect settings can lead to temperature fluctuations, food spoilage, and even health concerns. Here’s how to ensure your refrigerator and freezer are set at the right temperatures for optimal cooling:
- Refrigerator Temperature: The recommended refrigerator temperature range is typically between 35°F (1.7°C) and 38°F (3.3°C). Here’s how to adjust it:
- Locate the Temperature Control: Depending on your refrigerator model, you’ll find the temperature control settings either inside the fridge
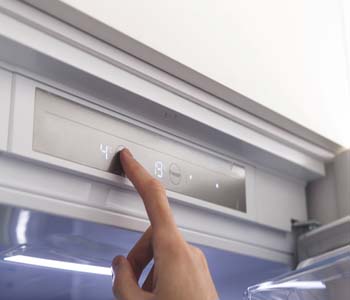 or on the exterior.
 - Adjust the Temperature: Use the control to increase or decrease the temperature as needed. Refer to your refrigerator’s user manual for specific instructions.
- Monitor with a Thermometer: To verify the accuracy of the temperature, place a refrigerator thermometer on a shelf. Check it periodically to ensure it stays within the recommended range.
Follow these steps to adjust the freezer temperature:
- Locate the Freezer Temperature Control: Similar to the refrigerator, the freezer’s temperature control may be inside or on the exterior.
- Set the Desired Temperature: Adjust the control to achieve a temperature at or below 0°F (-17.8°C).
- Use a Freezer Thermometer: To confirm the freezer’s temperature accuracy, place a freezer thermometer inside.
The freezer should be kept at 0°F (-17.8°C) or lower.
Unblocking Air Vents for Better Airflow
Causes and Solutions of blocked vents
- Overloading the Fridge:
Cause: Packing your fridge too full can obstruct airflow, leading to blocked vents. When air can’t circulate freely, some areas may become warmer than others.
Solution: Organize the contents to allow air to flow around items. Avoid overcrowding, especially near vents.
2. Unsuitable Food Containers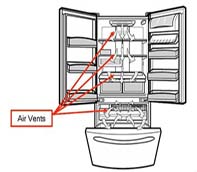
Cause: Large containers or oversized food items can obstruct air vents when placed incorrectly inside the fridge.
Solution: Use smaller containers for leftovers and cut larger items into manageable portions. Be mindful of where you place items to ensure they don’t block vents.
3. Frozen Food Blocking Vents:
Cause: Occasionally, food items can freeze together and block the vents, hindering airflow.
Solution: Periodically rearrange frozen items to prevent them from sticking together and obstructing vents.
4. Faulty Door Seals
Cause: If the door seals (gaskets) are damaged or worn, warm air from outside can enter the fridge, causing condensation and ice buildup near vents.
Solution: Inspect the door seals for damage and replace them if necessary. Ensure that the doors are tightly closed. Excessive Frost or Ice Buildup: Ice or frost accumulation inside the freezer can extend into the fridge and block air vents.
5. Excessive Frost or Ice Buildup
Cause: Ice or frost accumulation inside the freezer can extend into the fridge and block air vents.
Solution: Regularly defrost your freezer and remove any excess ice or frost. Keep the freezer door tightly closed to prevent warm air from entering.
6. Regular Maintenance:
Solution: Schedule routine maintenance checks for your refrigerator to identify and address any potential issues that could lead to blocked air vents.
By addressing these causes and implementing these solutions, you can ensure that the air vents in your fridge remain clear, allowing for proper airflow and efficient cooling throughout
Evaporator Fan Problems
Unplug the refrigerator or turn off its power supply before starting any repairs
The evaporator fan in your refrigerator plays a crucial role in maintaining proper cooling by circulating cold air throughout the appliance. When this fan encounters issues, it can lead to temperature fluctuations and reduced cooling efficiency. Here’s how to identify and troubleshoot evaporator fan problems in your refrigerator:
Common Signs of Evaporator Fan Problems: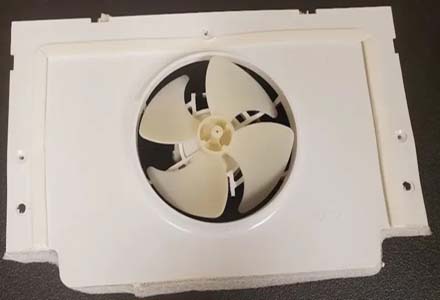
- Uneven Cooling: If some areas of your refrigerator or freezer are colder than others, it may indicate that the evaporator fan is not distributing cold air evenly.
- Noises: Unusual noises, such as grinding, squeaking, or rattling, coming from the refrigerator’s interior may be a sign of a malfunctioning evaporator fan.
- Warm Air: If you notice that your refrigerator is not as cold as it should be, the evaporator fan might not be working correctly.
Troubleshooting Evaporator Fan Issues:
- Check for Blockages: Open the refrigerator or freezer and inspect the area around the evaporator fan. Ensure there are no food items or debris obstructing the fan blades.
- Listen for Fan Operation: Listen carefully for the sound of the evaporator fan running. If you don’t hear it when the refrigerator is supposed to be cooling, there may be an issue with the fan motor or its components.
- Inspect the Fan Blades: Visually examine the fan blades for damage or signs of wear. Damaged blades may need to be replaced.
Solutions for Evaporator Fan Problems:
Unplug the refrigerator or turn off its power supply before starting any repairs
- Unblock Obstructions: If you find any obstructions near the fan blades, carefully remove them to allow the fan to function properly.
- Defrost the Freezer: In some cases, excessive frost buildup in the freezer can block the evaporator fan. If this is the issue, defrost the freezer and ensure the fan is free from ice or frost.
- Inspect Fan Motor: If the fan motor is not running or making unusual noises, it may need replacement. Consult your refrigerator’s user manual or a technician for instructions on how to replace the fan motor.
Additional advices: - Regular Cleaning: Periodically clean the evaporator fan and surrounding areas. Dust and debris buildup can hinder the fan’s performance. Disconnect power and use a soft brush or compressed air to clean.
- Check for Obstructions: Inspect the area around the fan for any obstructions, such as ice buildup or food items. Clear any blockages to allow the fan to operate smoothly.
- Fan Blade Inspection: Check the condition of the fan blades. If they are damaged or bent, they can create noise and reduce airflow. Replace the fan or blades as needed.
- Listen for Unusual Noises: Pay attention to any unusual noises coming from the evaporator fan. A loud or grinding noise may indicate a problem. If you hear such sounds, it’s advisable to have the fan inspected and replaced if necessary.
- Defrost the Freezer: If the evaporator fan is located in the freezer compartment and you notice reduced cooling or frost buildup, it might be due to a defrosting issue. Perform a manual defrost to address ice accumulation on the evaporator coils.
- Inspect Wiring: Check the wiring and connections to the evaporator fan motor. Loose or damaged wires can cause the fan to malfunction. Ensure all connections are secure.
- Test the Fan Motor: If you suspect an issue with the fan motor, you can perform a simple test. Disconnect the power and use a multimeter to check the continuity of the motor. If there is no continuity, it may indicate a faulty motor that needs replacement.
- Replace the Motor: If the evaporator fan motor is indeed the problem, replace it with a compatible motor recommended by the refrigerator’s manufacturer. Follow the manufacturer’s instructions for installation.
Clearing the Condenser Coils
Disconnect the fridge before starting repairs.
Causes of Unclear Condenser Coils
Dust and Debris Buildup: Over time, dust, dirt, and pet hair can accumulate on the condenser coils, creating an insulating layer that prevents efficient heat dissipation.
Pet Hair: If you have pets in your home, their fur can easily get drawn into the condenser coils’ airflow, exacerbating the problem.
Solutions of Unclear Condenser Coils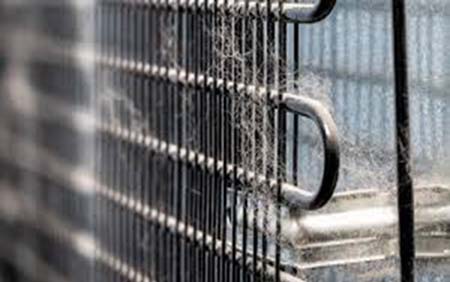
Regular Cleaning: It’s essential to clean the condenser coils regularly to prevent blockages. Here’s how to do it:
- Locate the condenser coils, typically located either on the back of the fridge or beneath it.
- Use a vacuum cleaner with a brush attachment or a coil brush to gently remove the dust and debris. Ensure thorough cleaning of the entire coil surface.
Frequency of Cleaning: The frequency of cleaning depends on various factors, including the environment and the presence of pets. In general, aim to clean the condenser coils every 6-12 months. However, if you notice significant dust buildup, more frequent cleaning may be necessary.
Pet Hair Management: If you have pets, consider using a lint roller or pet hair remover to remove hair from the refrigerator’s coils and surrounding area. This can help reduce the risk of clogs.
Check the Fan: Some refrigerators have a fan near the condenser coils. Ensure the fan is functioning correctly, as it helps with airflow and cooling. If the fan isn’t working, it may need to be repaired or replaced.
Maintain Proper Clearance: Make sure there is enough clearance around the refrigerator for adequate airflow. Avoid pushing the fridge too close to the wall, which can hinder airflow to the coils.
Refrigerant Leaks
Recognizing Signs of Refrigerant Leaks:
Inadequate Cooling: One of the most common signs of a refrigerant leak is insufficient cooling in both the refrigerator and freezer compartments.
Increased Energy Consumption: If your refrigerator is running longer and more frequently, it may be compensating for the lost refrigerant by working harder, leading to higher energy bills.
Warm Spots: You might notice warm spots inside your fridge or freezer, even if the surrounding areas are still cold.
Unusual Sounds: Some refrigerators may make hissing or gurgling noises when there’s a refrigerant leak.
What to Do if You Suspect a Refrigerant Leak:
Disconnect the fridge before starting repairs.
- Ventilation: Good ventilation is crucial when dealing with refrigerant leaks. Open windows and doors in the area to allow fresh air to circulate and disperse any leaking gases.
- Identify the Leak: Look for signs of a refrigerant leak, such as hissing or bubbling sounds, a noticeable decrease in cooling performance, or a visible oily residue around or inside the refrigerator.
- Do Not Attempt DIY Repairs: Refrigerant handling requires specialized training and equipment. It’s illegal and unsafe to attempt DIY repairs or recharge refrigerant without the proper certification. Leave this task to trained professionals.
- Contact a Technician: Call a licensed and certified appliance repair technician who specializes in refrigeration systems. They have the expertise and equipment to safely diagnose and repair refrigerant leaks.
- Evacuate the Area: If the suspected leak is severe or if you notice a strong chemical smell, evacuate the area immediately and avoid inhaling any fumes. Contact emergency services if necessary.
- Prevent Cross-Contamination If you suspect a refrigerant leak in the freezer, ensure that no food is cross-contaminated with the leaked refrigerant. Dispose of any affected food items properly.
- Be Patient: Refrigerant leak repairs may take some time. Follow the technician’s recommendations, and avoid using the refrigerator until it has been deemed safe and repaired.
- Consider Replacement:Depending on the age and condition of your refrigerator, it may be more cost-effective to replace it if a significant refrigerant leak is found. Discuss this possibility with the technician.
- Future Prevention: To prevent future refrigerant leaks, follow proper maintenance practices for your refrigerator, including regular cleaning of condenser coils, keeping the appliance level, and avoiding overloading it.
Additional Tips for Keeping Your Refrigerator Cool
- Keep Foods Covered: Cover or seal food items before placing them in the refrigerator. This helps prevent moisture loss and keeps your refrigerator’s humidity at the ideal level.
- Use Airtight Containers: Store leftovers and perishable items in airtight containers or resealable bags to prevent odors from spreading and to maintain freshness.
- Store Food at the Right Temperature: Be mindful of the recommended storage temperatures for various foods. For example, keep dairy products in the coldest part of the refrigerator.
- Regularly Check Temperature Settings: Periodically verify that your refrigerator and freezer are set to the appropriate temperature levels. Refer to your appliance’s manual for guidance.
- Avoid Overloading: While it’s important not to underfill your refrigerator, avoid overloading it, as this can obstruct airflow and affect cooling efficiency.
- Check Door Seals: Routinely inspect the door seals (gaskets) for any signs of wear, damage, or looseness. Damaged seals can lead to cold air escaping and warm air entering.
- Cool Hot Foods Before Storing: Allow hot dishes or cooked foods to cool to room temperature before placing them in the refrigerator. Hot items can raise the internal temperature.
- Be Mindful of Placement: Keep items that are sensitive to temperature fluctuations, such as dairy and eggs, away from the refrigerator door, which is often subject to temperature variations when opened frequently.
- Clean the Drain Tube: If your refrigerator has a drain tube, ensure it is clear of debris to prevent water from accumulating inside the appliance.
- Defrost Freezers as Needed: If you have a manual defrost freezer, periodically check for frost buildup and defrost it when necessary to maintain optimal cooling.
- Regularly Clean the Interior: Wipe down the interior of your refrigerator and freezer regularly to remove spills, crumbs, and any food residues that can affect cooling.
- Check for Ice Buildup: In frost-free freezers, occasional ice buildup can occur. Remove any excessive ice to maintain proper airflow.
- Avoid Blocking Air Vents: Be cautious not to block air vents in both the refrigerator and freezer compartments. Proper airflow is essential for consistent cooling.
- Inspect and Replace Filters: If your refrigerator has water or air filters, replace them as recommended by the manufacturer to ensure they continue to function effectively.
By following these additional tips, you can help keep your refrigerator operating efficiently, extend its lifespan, and ensure that your food stays fresh and safe for consumption.
Professional Help: When to Call a Technician
At Appliances Giants, we’re committed to resolving your refrigerator issues promptly and professionally. If you’re facing any of the mentioned problems or need expert assistance, our certified technicians are here to help. Your satisfaction and the efficient operation of your appliance are our top priorities. Contact Appliances Giants today to schedule a service call and ensure your refrigerator is performing at its best. Don’t wait – reach out to us now for reliable and prompt service! Your convenience is our expertise.”