Is your dishwasher leaking from bottom? Don’t worry, you’re not alone. Many homeowners and tenants face this frustrating issue with their appliances. A leaking dishwasher can not only create a mess in your kitchen but also lead to potential water damage if left unaddressed. In this beginner’s guide, we will explore the common causes of dishwasher leaks and provide practical solutions to help you resolve the problem.
Why is Dishwasher Leaking?
A dishwasher can leak from various parts, and it’s essential to identify the root cause before attempting any repairs. Let’s delve into the most common reasons why your dishwasher leaking from bottom when not running.
Faulty Water Inlet Valve
The water inlet valve is responsible for supplying water to your dishwasher during the wash cycle. If this valve becomes defective or worn out, it can lead to leaks. Inspect the water inlet valve for any signs of damage or deterioration. If you notice any issues, such as cracks or leaks, replacing the water inlet valve should resolve the problem.
Clogged Filter
A clogged filter is another potential cause of a leaking dishwasher. The filter plays a vital role in preventing food particles and debris from entering the dishwasher’s pump and spray arms. Over time, the filter can become clogged with food residue, affecting water flow and leading to leaks.
To address a dishwasher leaking from the bottom left corner caused by a clogged filter, follow these steps:
- Turn off the dishwasher: Before beginning any maintenance work, make sure the dishwasher is powered off and disconnected from the electrical supply for safety.
- Locate and access the filter: The filter is typically located at the bottom of the dishwasher, near the spray arms. Refer to your dishwasher’s user manual to find the exact location and access points for the filter.
- Remove the filter: Depending on your dishwasher model, the filter may have a removable cartridge or a combination of filters. Carefully remove the filter according to the manufacturer’s instructions. Take note of the filter’s orientation for proper reinstallation.
- Clean the filter: Rinse the filter under warm water to remove any visible debris or residue. For stubborn build-up, use a soft brush or toothbrush to gently scrub the filter, ensuring all the clogged particles are dislodged. Make sure to clean all sides and crevices of the filter thoroughly.
- Inspect for damage: While cleaning the filter, examine it for any signs of damage, such as cracks or tears. If the filter is damaged, it is crucial to replace it with a new one to ensure optimal performance.
- Clean the filter housing: After removing the filter, check the filter housing for any accumulated debris or blockages. Use a damp cloth or sponge to wipe away any residue and ensure the housing is clean.
- Reinstall the filter: Once the filter and housing are clean, carefully reinstall the filter according to the manufacturer’s instructions. Ensure it is securely placed and properly aligned.
- Run a test cycle: Close the dishwasher door and run a short test cycle without any dishes inside. Monitor the dishwasher closely for any signs of leaks from the bottom left corner. If the issue persists, further investigation or professional assistance may be required.
Leaking Door Panel Seal
One of the common causes of dishwasher leaks is a leaking door panel seal. The door panel seal, also known as the gasket, plays a crucial role in creating a watertight seal when the dishwasher door is closed. However, over time, this seal can become worn out, torn, or develop cracks, leading to water escaping from the bottom of the door.
To determine if the door panel seal is the culprit behind your dishwasher leak, carefully inspect it for any signs of damage. Look for tears, cracks, or any visible wear and tear. If you notice any issues, it’s important to replace the door panel seal promptly.
Replacing the door panel seal is a relatively simple task that can help prevent future leaks. Begin by purchasing a replacement seal from your dishwasher’s manufacturer or an authorized dealer. Make sure to select the correct seal that is compatible with your dishwasher model.
To install the new door panel seal, follow these steps:
- Turn off the dishwasher: Before starting any repair work, ensure that the dishwasher is powered off and disconnected from the electrical supply. This will prevent any accidents during the replacement process.
- Remove the old seal: Carefully peel off the old door panel seal from the dishwasher door. Take note of the seal’s orientation to ensure proper installation of the new one.
- Clean the seal area: Thoroughly clean the area where the seal sits using a mild detergent and warm water. Remove any debris, residue, or old adhesive to ensure a clean and smooth surface for the new seal.
- Attach the new seal: Begin attaching the new door panel seal by aligning it with the corresponding groove on the dishwasher door. Gently press and push the seal into place, ensuring a secure fit along the entire perimeter of the door. Take your time to ensure the seal is properly aligned and seated correctly.
- Test the seal: Once the new door panel seal is installed, perform a quick test to check its effectiveness. Close the dishwasher door and run a short cycle with no dishes inside. Monitor the dishwasher closely for any signs of leaks during the wash and drain cycles. If you notice any leaks, double-check the seal’s installation and make any necessary adjustments.
By replacing a worn or damaged door panel seal, you can effectively address the issue of dishwasher leaking from the bottom of the door. A properly installed and functioning seal will create a tight seal when the dishwasher door is closed, preventing water from escaping and causing leaks.
Remember, if you are unsure about the replacement process or encounter any difficulties, it is always recommended to consult the dishwasher’s user manual or seek assistance from a professional appliance repair technician. They can provide expert guidance and ensure the correct installation of the new door panel seal to resolve the leaking issue effectively.
Now that we have explored the common causes and solutions for a leaking dishwasher, let’s move on to addressing another potential source of leaks: dishwasher leaking underneath.
Broken Water Pump System
A broken water pump system can be a significant cause of a dishwasher leaking from the bottom right corner. The water pump is responsible for circulating water throughout the dishwasher during the wash and drain cycles. If the pump or any of its components become damaged or malfunction, it can lead to leaks and water pooling in the bottom right corner of the dishwasher.
To address a dishwasher leaking from the bottom right corner caused by a broken water pump system, follow these steps:
- Turn off the dishwasher: Ensure that the dishwasher is powered off and disconnected from the electrical supply before attempting any repairs. This is crucial for your safety.
- Access the water pump: The water pump is typically located at the bottom of the dishwasher, near the center or on the right side. Consult your dishwasher’s user manual to find the exact location and access points for the water pump.
- Inspect the water pump: Carefully examine the water pump, motor, and associated hoses for any visible signs of wear, damage, or loose connections. Look for cracks, leaks, or corrosion on the pump housing or any other components.
- Check the hoses: Ensure that the hoses connected to the water pump are securely attached and free from blockages or kinks. If you notice any damaged or worn-out hoses, they should be replaced.
- Replace faulty components: If you identify any damaged or malfunctioning parts, such as a faulty pump motor or a damaged pump housing, they will need to be replaced. Contact your dishwasher’s manufacturer or a professional appliance repair service to obtain the correct replacement parts.
- Follow manufacturer’s instructions: When replacing any components, make sure to follow the manufacturer’s instructions carefully. This includes disconnecting and reconnecting any electrical connections and ensuring proper alignment and tightening of screws or fasteners.
- Test the dishwasher: After completing the repairs, run a short test cycle with no dishes inside to check for any remaining leaks. Monitor the dishwasher closely, paying particular attention to the bottom right corner, where the leak was occurring. If you no longer observe any signs of leaking, the issue is likely resolved. However, if leaks persist, it is advisable to seek professional assistance.
Improperly Attached Door
Sometimes, a leaking dishwasher can be attributed to a simple problem like an improperly attached door. If the door is not aligned correctly or does not close tightly, water can escape through the gaps. Adjust the door alignment or latch to ensure a snug fit when closed.
Corrosion and Standing Water in the Tub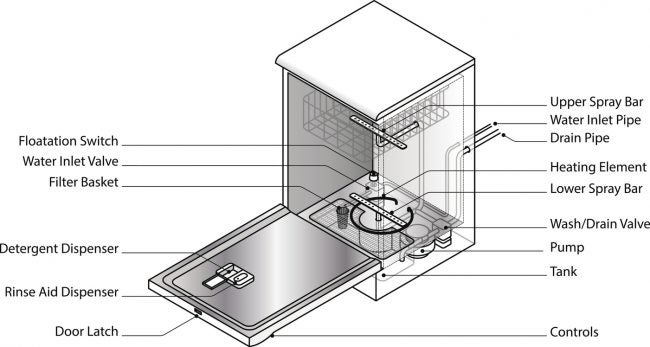
Corrosion inside the dishwasher tub or the presence of standing water can contribute to leaks. Check the interior of the dishwasher for any signs of rust or corrosion. If you find any, remove the corrosion using appropriate cleaning methods. Additionally, if there is standing water in the dishwasher between cycles, it could be a sign of a drainage problem. Inspect the drain system and address any blockages or malfunctions.
Issues with the Air Vent on Top of the Sink
If you find that your dishwasher is leaking, one potential culprit could be issues with the air vent on top of the sink. The air vent, also known as the air gap, is a crucial component that prevents the backflow of water from the sink into the dishwasher. When the air vent becomes clogged or obstructed, it can disrupt the proper functioning of the dishwasher and result in leaks.
To address issues with the air vent causing your dishwasher to leak, follow these steps:
- Identify the air vent: Locate the air vent on top of the sink. It is typically a small cylindrical or domed structure connected to the drain hose or mounted separately.
- Inspect for blockages: Carefully examine the air vent for any visible signs of blockages or debris. Common culprits include food particles, soap residue, or mineral deposits that can accumulate over time. Use a flashlight if needed to get a clear view of the vent.
- Remove debris: If you notice any blockages, it is essential to remove them to restore proper airflow. Gently clean the air vent by rinsing it with warm water and using a soft brush or toothbrush to dislodge any stubborn debris. Take care not to damage the vent during the cleaning process.
- Check the drain hose: While addressing the air vent, inspect the connected drain hose as well. Ensure that the hose is free from any obstructions or kinks that could impede the proper flow of water. Straighten out any kinks and clear any blockages as necessary.
- Reassemble and test: Once the air vent and drain hose are clean and clear, reassemble the components and run a test cycle on your dishwasher. Monitor the unit closely to see if the leak has been resolved. If the dishwasher no longer leaks, the issue with the air vent was likely the cause. However, if the problem persists, it is advisable to explore other potential causes or seek professional assistance.
Overfilled Dishwasher
Overfilling the dishwasher with dishes and utensils can lead to water overflowing from the bottom. Ensure that you load the dishwasher according to the manufacturer’s guidelines and leave enough space for water circulation. Avoid overcrowding the dishwasher to prevent leaks.
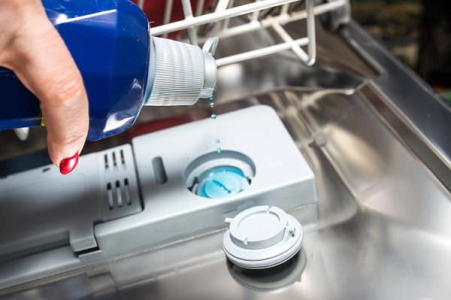
Incorrect Dishwasher Detergent
Using the wrong type of dishwasher detergent or using too much detergent can create excessive suds that may result in leaks. Verify that you are using the appropriate detergent recommended by the dishwasher manufacturer. Follow the detergent’s usage instructions to prevent oversudsing and potential leaks.
Unresponsive Float Switch
The float switch is a safety feature that prevents overfilling by shutting off the water supply when the water level reaches a certain point. If the float switch becomes stuck or fails to activate, it can lead to water overflowing and leaking from the bottom. Inspect the float switch for any obstructions or defects and replace it if necessary.
Damaged Drain Hose
The drain hose is responsible for carrying wastewater out of the dishwasher. If the drain hose becomes damaged or develops cracks, it can cause leaks. Check the drain hose for any signs of wear, tears, or blockages. Replace the hose if needed and ensure it is properly connected to the dishwasher and the drain.
Loose Door Latch
If you notice water leaking from your dishwasher, one possible cause could be a loose door latch. A properly functioning door latch is essential for creating a tight seal when the dishwasher door is closed. When the latch is loose or faulty, it can result in an improper seal, allowing water to escape during the wash cycle.
To address a loose door latch causing water leakage, follow these steps:
- Inspect the door latch: Carefully examine the door latch for any signs of damage, misalignment, or wear. Check for any visible cracks, breaks, or other indications that the latch may be compromised.
- Tighten the latch: If the door latch is loose, you can often resolve the issue by tightening it. Using a screwdriver or the appropriate tool, tighten the screws or fasteners that secure the latch mechanism to the dishwasher door. Ensure that the latch is firmly attached and properly aligned for a secure closure.
- Replace the latch: If the door latch is damaged beyond repair or tightening the screws does not resolve the issue, it may be necessary to replace the latch. Contact your dishwasher’s manufacturer or a professional appliance repair service to obtain the correct replacement latch. Follow the manufacturer’s instructions for installation, ensuring that the new latch is properly aligned and securely attached to the dishwasher door.
- Test the dishwasher: Once the door latch has been tightened or replaced, run a test cycle on your dishwasher. Pay close attention to the area where the leak was occurring and check for any signs of water leakage. If the latch is functioning properly, the water leakage should be resolved. However, if the issue persists, it is advisable to explore other potential causes or seek professional assistance.
Corroded Dishwasher Tub
Over time, the dishwasher tub can corrode, leading to leaks. Inspect the interior of the dishwasher tub for any signs of corrosion, such as rust or pitting. If corrosion is present, it may be necessary to replace the dishwasher tub to prevent further leaks.
Leaking Pump Seal
The pump seal prevents water from leaking out of the dishwasher’s pump assembly. If the pump seal becomes worn out or damaged, water can escape and cause leaks. Inspect the pump seal for any signs of deterioration and replace it if necessary.
By identifying the specific cause of your dishwasher leak and following the corresponding solution, you can resolve the issue and prevent further water damage. However, if you are unsure or uncomfortable performing any repairs yourself, it is always recommended to seek professional help. Remember, proper maintenance and regular inspection of your dishwasher can help prevent leaks and extend its lifespan.
A leaking dishwasher can be a frustrating problem, but with the right knowledge and troubleshooting steps, you can address the issue effectively. Whether it’s a faulty water inlet valve, a clogged filter, or a damaged door seal, identifying the cause and taking appropriate action will help you fix the leak and restore your dishwasher’s functionality.
Remember, your dishwasher is designed to make your life easier, not messier. So, don’t let a leaking dishwasher dampen your spirits—take action, resolve the issue, and enjoy the convenience of a fully functioning appliance in your kitchen.